Crnsk
| Author: |
Kimco |
| Release: |
"Micom" Aug. 1985 Issue |
| Program length: |
19 screens |
| Japanese title name |
くらのすけ |
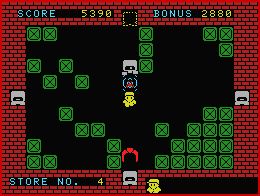 Space (Trigger 1): Put a confuser that crashes a robot or stuns the claw for a while.
Note: After you put a confuser, you must move immediately! Otherwise, you will pick it up soon.
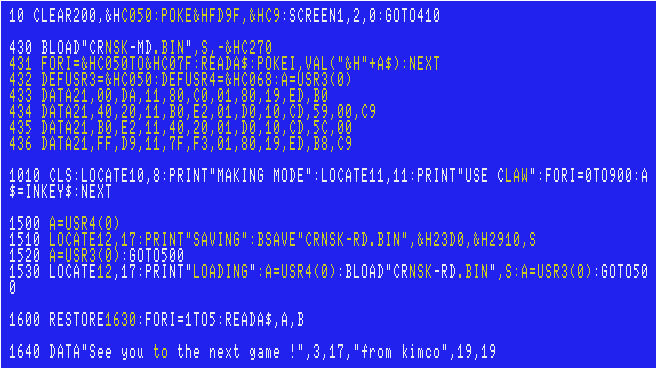
The 1st file:
First, particular attention should be paid when typing lines below.
For disk users:
This game is originally for tape only. This is because part of the program's area of use overlaps with the 1st disk's work area.
To load the game on Disk Basic, modify the code as below.
(Description)
The line #433(C050H~): Copy the 1st disk's work area (DA00H~F37FH) to (C080H~D9FFH).
The line #434(C05BH~): Restore the game's work area.
The line #435(C068H~): Copy the game's work area (E2B0H~F37FH) to "2040H~3110H" of VRAM.
The line #436(C074H~): Restore the 1st disk's work area.
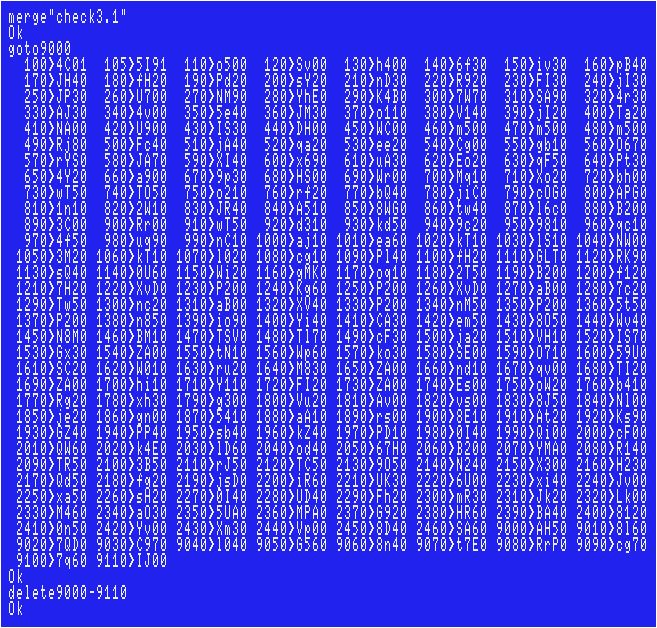
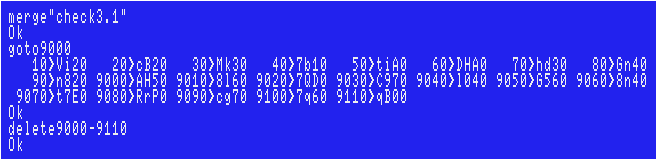
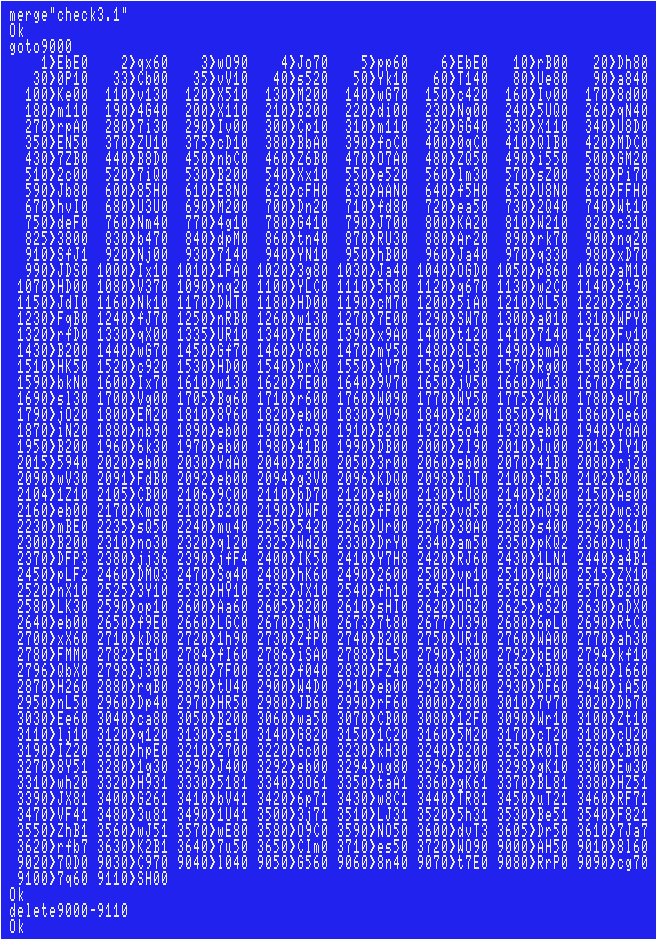
If you modify the code as described above, each checksum will change as follows. (using version 3.1 coded by the "MSX•FAN" team).
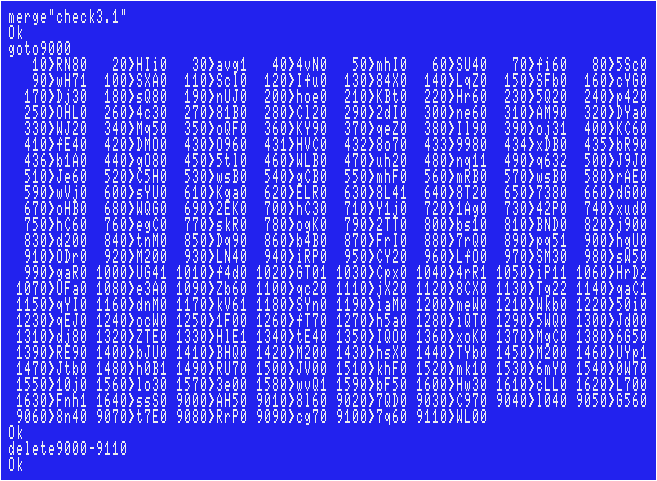
Sorry if there are any typos, however, I've tested my data, and had no problems.
The 2nd file named "CRNSK-MD.BIN":
The original file name was "CR-MD", but I'm assuming that you're managing a huge amount of MSX games' files.You cannot even save/load this file on Disk Basic. First, enter all data using a binary editor on Windows to create one.
In such cases, we Japanese usually use freeware called "DumpWithRTCS".
Choose "Tool(T)">"Address Offset(A)...". Enter "E2B0". Then enter all hexadecimal numbers to F1FFH.
Particular attention should be paid when typing the numbers below.
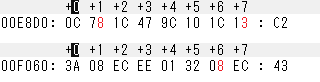
Don't forget to compare each checksum with that in the magazine. (Choose "Checksum(C)">"Add8(E)")
Finally add a header as shown below to complete.
FE B0 E2 FF F1 B0 E2
The 3rd file (The "memory monitoring" program):
You don't create this file if you use "DumpWithRTCS" described above.To load the game:
Simply run the 1st file.Note: Too difficult to put a confuser? You can make the game's speed slower by the modification below.
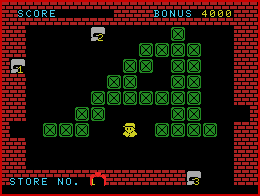 |
Level editor: First, press F3 key at the title screen. You can move the claw like a claw machine. Hold SPACE key to grab an object and release the SPACE key to put the object there. After you release the green box, you can also copy it if you move the claw soon. C key: Crash the leftmost / rightmost wall(s). CLS key (CTRL+L): Erase all the objects and restart to create your own level again. You must move the claw just right to "STORE NO." words and enter a number. If you want to enter "1", you don't have to enter "01" or " 1". Just enter "1". You can also modify the value of time bonus by the same method. Finally press Return key. After it asks you "OK ?(Y/N)", press "Y" key. To save your own levels, press F4 key at the title screen. |
Joystick support:
This game originally supports joystick, however, you can modify the code to avoid F1 / F2 keys to start the game.
A keyboard is still a must when you create your own maps, though!
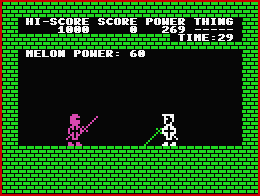
Lemon Princess
| Author: |
Guwaba |
| Release: |
"Micom" Sep. 1985 Issue |
| Program length: |
9 screens |
| Japanese title name |
レモンプリンセス |
Note:
Each checksum will be as follows. (using version 3.1 coded by the "MSX•FAN" team).
 Sorry if there are any typos, however, I've tested my data and had no problems.
Joystick support:
"STICK(0)" is found in the lines #360 and #560."STRIG(0)" is found in the lines #420 and #590. The quickest way is to simply replace each "0" with "1".
In addition, modify the lines as below.

For Amiga CD32 + FDD users:
AmiMSX can't enlarge sprites. Modify the code as below.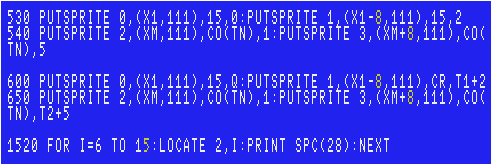
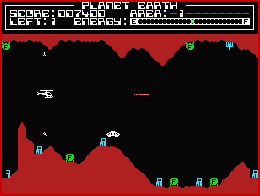
Planet Earth
| Author: |
S. Ogawa |
| Release: |
"Micom" May 1985 Issue |
| Program length: |
60 screens |
The 1st file:
For disk users:This game is originally for tape only. This is because part of the program's area of use overlaps with the 1st disk's work area.
To load the game on Disk Basic, modify the code as below.

If you modify the code as described above, each checksum will change as follows. (using version 3.1 coded by the "MSX•FAN" team).
Sorry if there are any typos, however, I've tested my data, and had no problems.
The dump files:
You cannot even save/load the games' memory dump file named "M2" on Disk Basic.First, enter all data using a binary editor on Windows to create one.
In such cases, we Japanese usually use freeware called "DumpWithRTCS".
The 2nd file named "PLANETE1.BIN":
The original file name was "M1", but I'm assuming that you're managing a huge amount of MSX games' files.Choose "Tool(T)">"Address Offset(A)...". Enter "A000". Then enter all hexadecimal numbers to AB4FH.
For disk users, modify the code as below.
 This file originally loads the next dump file by itself, but this time you have to disturb it!
Don't forget to compare each checksum with that in the magazine. (Choose "Checksum(C)">"Add8(E)")
Finally add a header as shown below to complete.
FE 00 A0 4F AB 00 A0
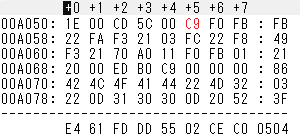
The file called "M2":
Choose "Tool(T)">"Address Offset(A)...". Enter "9B00". Then enter all hexadecimal numbers to F0FFH.Don't forget to compare each checksum with that in the magazine. (Choose "Checksum(C)">"Add8(E)")
Then split it into 2 files. One is from 9B00H to D9FFH, and the other is from DA00H to F0FFH.
The 3rd file named "PLANETE2.BIN":
Add a header as shown below to complete.FE 00 9B FF D9 00 9B
The 4th file named "PLANETE3.BIN":
Add a header as shown below to complete.FE 00 DA FF F0 00 DA
The 5th file (The "memory monitoring" program):
You don't create this file if you use "DumpWithRTCS" described above.The 6th file (The "checksum" program named "OGAWA.BAS"):
You don't create this file if you use "DumpWithRTCS" described above.To load the game:
 Simply run the 1st file.
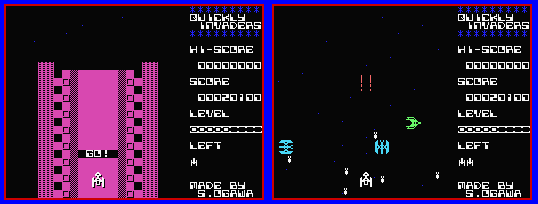
Quickly Invaders
| Author: |
S. Ogawa |
| Release: |
"Micom" Dec. 1984 Issue |
| Program length: |
19 screens |
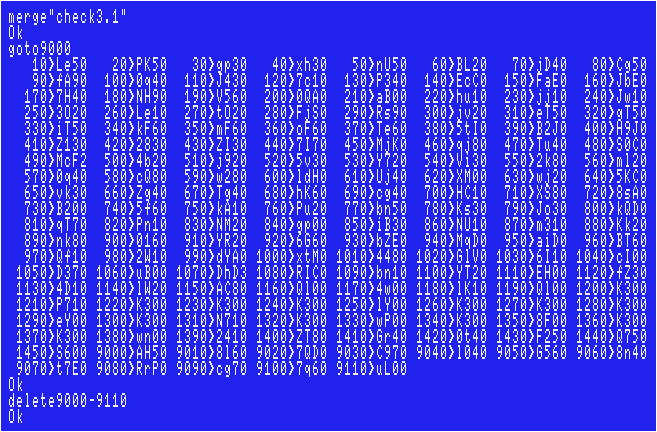
The 1st file:
For disk users:This game is originally for tape only. This is because part of the program's area of use overlaps with the 1st disk's work area.
To load the game on Disk Basic, modify the code as below.
If you modify the code as described above, each checksum will change as follows. (using version 3.1 coded by the "MSX•FAN" team).
Sorry if there are any typos, however, I've tested my data, and had no problems.
The dump files:
You cannot even save/load the games' memory dump file named "M2" on Disk Basic.First, enter all data using a binary editor on Windows to create one. In such cases, we Japanese usually use freeware called "DumpWithRTCS".
The 2nd file named "QUICKLY1.BIN":
The original file name was "M1", but I'm assuming that you're managing a huge amount of MSX games' files.Choose "Tool(T)">"Address Offset(A)...". Enter "B000". Then enter all hexadecimal numbers to BFFFH.
Don't forget to compare each checksum with that in the magazine. (Choose "Checksum(C)">"Add8(E)")
Finally add a header as shown below to complete.
FE 00 B0 FF BF 00 B0
The 3rd file named "QUICKLY2.BIN":
The original file name was "M2", but I'm assuming that you're managing a huge amount of MSX games' files.Choose "Tool(T)">"Address Offset(A)...". Enter "E600". Then enter all hexadecimal numbers to EFFFH.
Don't forget to compare each checksum with that in the magazine. (Choose "Checksum(C)">"Add8(E)")
Finally a header as shown below to complete.
FE 00 E6 FF EF 00 E6
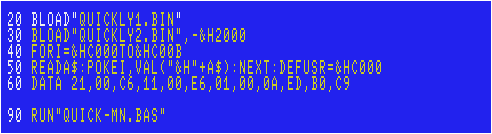
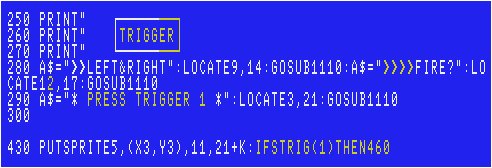
The 4th file named "QUICK-MN.BAS":
For disk users, modify the line #10 as below.
In addition, it would be better if you modify the line #1050. The original message was "YOU ARE HI-SCORE!!".
If you modify the code as described above, each checksum will change as follows. (using version 3.1 coded by the "MSX•FAN" team).
Sorry if there are any typos, however, I've tested my data, and had no problems.
The 5th file (The "memory monitoring" program):
You don't create this file if you use "DumpWithRTCS" described above.The 6th file (The "checksum" program named "OGAWA.BAS"):
You don't create this file if you use "DumpWithRTCS" described above.To load the game:
 Simply run the 1st file.
Joystick support:
The 2nd file: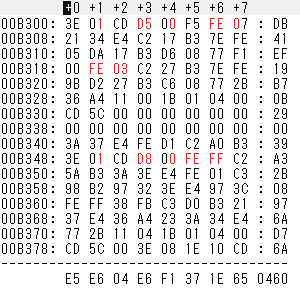
The 4th file:
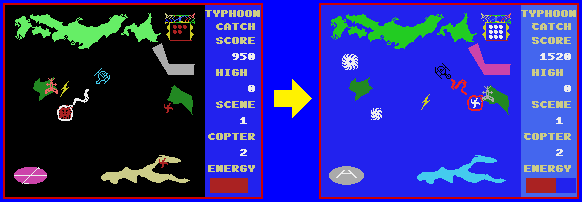
Typhoon Catch
| Author: |
Takaharu Uomi |
| Release: |
"Micom" Nov. 1984 Issue |
R: Restart the game after the game is over.
Note:
Particular attention should be paid when typing lines below.
Modify the lines as below.
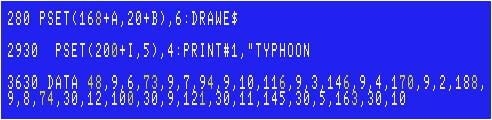
The line #3630: To fix the title logo.(See below.)
The lines #280 & #2930: Minor issues that are shown below. Fix them.

If you modify the code as described above, each checksum will change as follows. (using version 3.1 coded by the "MSX•FAN" team).
Sorry if there are any typos, however, I've tested my data, and had no problems.
Joystick support:
"STICK(0)" is found in the line #720. The quickest way is to simply replace each "0" with "1".In addition, modify the lines as below.
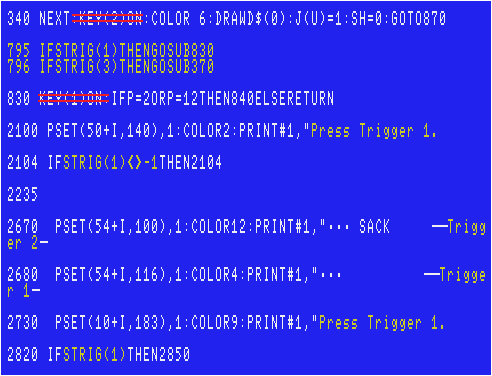
D-pad: Move., Trigger 1: Put a lightning conductor., Trigger 2: Shoot a special sack.
Change the color(s) as you want:
Below is the list of which lines each sprite or drawing is associated with. Please refer to.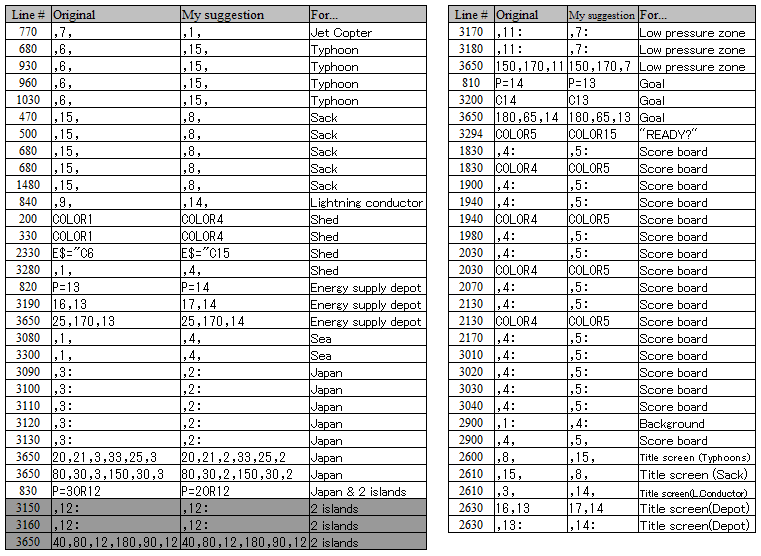
Here are my suggestions to the typhoon (medium and large size) sprites and the drawing of the depot.

>>Return to the "Type-in MSX programs" page