Attack! Mosquiton
| Author: |
S. Ogawa |
| Release: |
"Micom" June 1986 Issue |
| Program length: |
15 screens |
The 1st file:
For disk users:This game is originally for tape only. This is because part of the program's area of use overlaps with the 1st disk's work area.
To load the game on Disk Basic, modify the code as below.

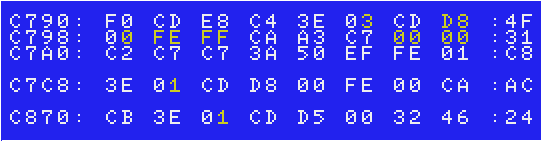
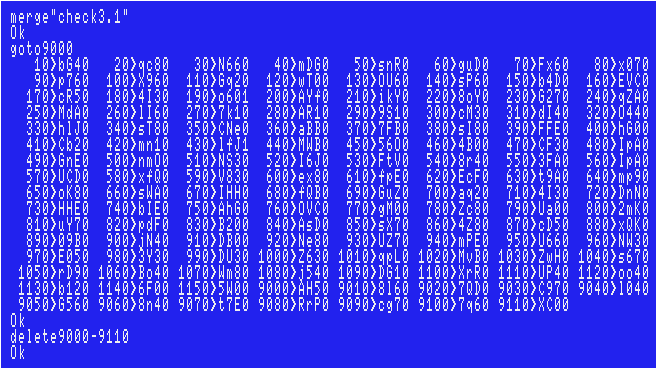
If you modify the code as described above, each checksum will change as follows. (using version 3.1 coded by the "MSX•FAN" team).
Sorry if there are any typos, however, I've tested my data, and had no problems.
The file called "MOSM":
You cannot even save/load the games' memory dump file on Disk Basic.First, enter all data using a binary editor on Windows to create one.
In such cases, we Japanese usually use freeware called "DumpWithRTCS".
The 2nd file named "MOSQUIT1.BIN":
Choose "Tool(T)">"Address Offset(A)...". Enter "C000". Then enter all hexadecimal numbers to CCFFH.Don't forget to compare each checksum with that in the magazine. (Choose "Checksum(C)">"Add8(E)")
Finally add a header as shown below to complete.
FE 00 C0 FF CC 00 C0
The 3rd file named "MOSQUIT2.BIN":
Choose "Tool(T)">"Address Offset(A)...". Enter "E000". Then enter all hexadecimal numbers to E5FFH.Don't forget to compare each checksum with that in the magazine. (Choose "Checksum(C)">"Add8(E)")
Finally add a header as shown below to complete.
FE 00 E0 FF E5 00 E0
The 4th file (The "memory monitoring" program):
You don't create this file if you use "DumpWithRTCS" described above.The 5th file (The "checksum" program named "OGAWA.BAS"):
You don't create this file if you use "DumpWithRTCS" described above.To load the game:
 Simply run the 1st file.
Joystick support:
The 1st file:"STRIG(0)" is found in the lines #470, #550, #610, #750 and #1330. The quickest way is to simply replace each "0" with "1".
In addition, it would be better if you modify the code as below.

The 2nd file (MOSQUIT1.BIN):

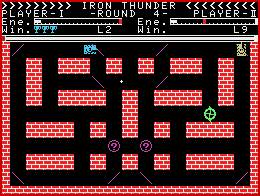
Iron Thunder
| Author: |
S. Ogawa |
| Release: |
(Basic files)"Micom" Jan. 1986 Issue (Dump file)"Micom" Feb. 1986 Issue |
| Program length: |
16 screens |
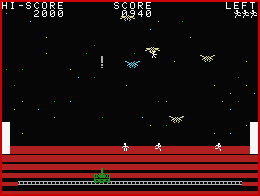
s, e, f and x keys: 1P moves., CTRL: 1P shoots.
Arrow keys: 2P moves., Kana: 2P shoots., Space: Start the game from the title screen / the game over screen.
*It also supports joystick.
The 1st file:
For disk users:This game is originally for tape only. This is because part of the program's area of use overlaps with the 1st disk's work area.
To load the game on Disk Basic, modify the code as below.
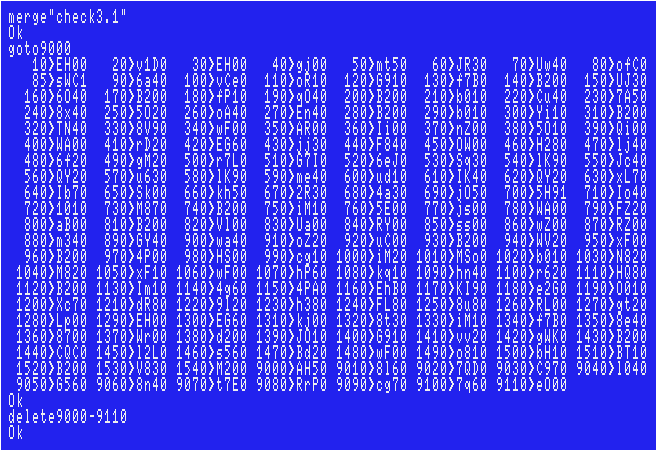
If you modify the code as described above, each checksum will change as follows. (using version 3.1 coded by the "MSX•FAN" team).
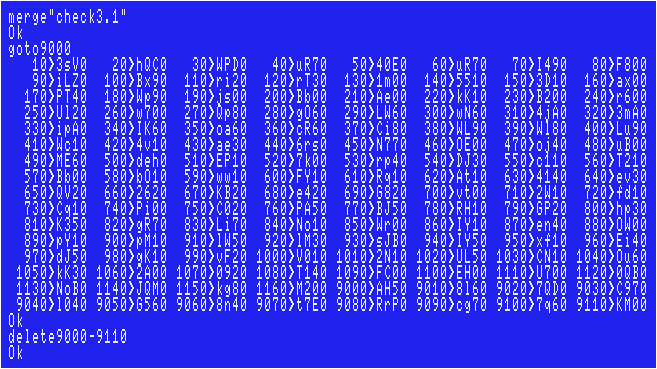
Sorry if there are any typos, however, I've tested my data, and had no problems.
The 2nd file named "IRON-T.BIN":
The original file name was "IRONM", but I'm assuming that you're managing a huge amount of MSX games' files.You cannot even save/load this file on Disk Basic.
First, enter all data using a binary editor on Windows to create one.
In such cases, we Japanese usually use freeware called "DumpWithRTCS".
Choose "Tool(T)">"Address Offset(A)...". Enter "D000". Then enter all hexadecimal numbers to E67FH.
Don't forget to compare each checksum with that in the magazine. (Choose "Checksum(C)">"Add8(E)")
Finally add a header as shown below to complete.
FE 00 D0 7F E6 00 D0
The 3rd file (The "memory monitoring" program):
You don't create this file if you use "DumpWithRTCS" described above.To load the game:
 Simply run the 1st file.
Joystick support:
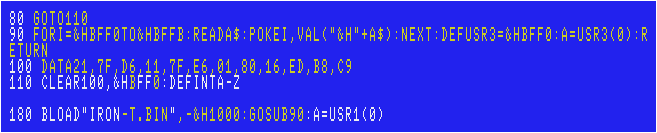
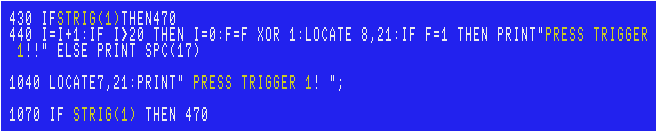
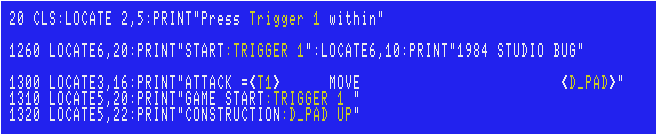
This game originally supports joystick, however, you can use Trigger 1 instead of Space key after the modification that is shown below.The 1st file:
Ostrich II
| Author: |
Toshio Tabeta |
| Release: |
"Micom" Apr. 1986 Issue |
The 1st file:
For disk users:The game itself can be load on Disk Basic, however, it breaks the 1st disk's work area after the program is loaded once.
Just before saving the level data created with the level editor to disk, it is necessary to restore the work area of the 1st disk.
Modify the lines as below.
If you modify the code as described above, each checksum will change as follows. (using version 3.1 coded by the "MSX•FAN" team).
Sorry if there are any typos, however, I've tested my data, and had no problems.
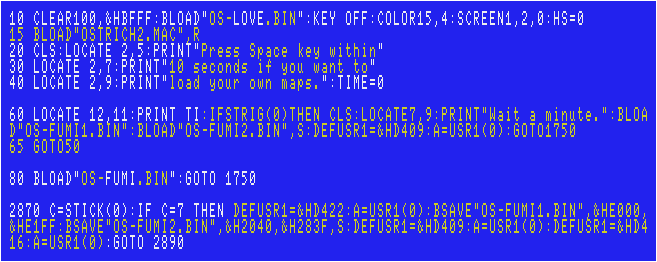
The 2nd file named "OS-LOVE.BIN":
The original file name was "LOVE", but I'm assuming that you're managing a huge amount of MSX games' files.Use the "memory monitoring" program that "MSX Magazine" team coded.
Save the file typing following:
BSAVE"OS-LOVE.BIN",&HC000,&HD3EF
Don't forget to compare each checksum with that in the magazine.(Use the 6th file.)
The 3rd file named "OS-FUMI.BIN":
The original file name was "FUMI", but I'm assuming that you're managing a huge amount of MSX games' files.Use the "memory monitoring" program that "MSX Magazine" team coded.
Save the file typing following:
BSAVE"OS-FUMI.BIN",&HE000,&HE1F8
Don't forget to compare each checksum with that in the magazine.(Use the 6th file.)
The 4th file (The "memory monitoring" program created by S.Ogawa)
You don't create this file if you have the same one created by MSX Magazine team.The 5th file named "OSTRICH2.MAC":
Use the "memory monitoring" program that "MSX Magazine" team coded.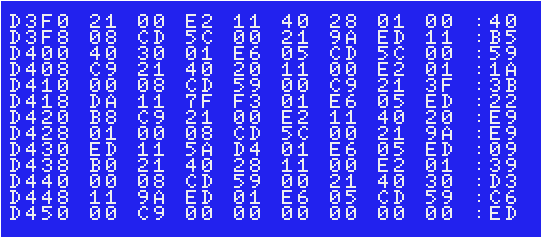
Don't forget to compare each checksum with that is shown above.(Type "DD3F0".)
Save the file typing following:
BSAVE"OSTRICH2.MAC",&HD3F0,&HD451,&HD3F0
(Description)
D3F0h~: Copy the 1st disk's work area part 1 (E200h~E9FFh) to VRAM (2840h~303Fh). Then copy the 1st disk's work area part 2 (ED9Ah~F37Fh) to VRAM (3040h~3625h).
D409h~: Restore the map data (from VRAM to RAM).
D416h~: Restore the game's work area (from "D45Ah~DA3Fh" to "ED9Ah~F37Fh")
D422h~:
Copy the map data (E200h~F9FF of RAM) to VRAM (2040h~283Fh). Then copy the game's work area (ED9Ah~F37Fh) to "D45Ah~DA3Fh".
Finally restore the 1st disk's work area (both part 1 and part 2).
The 6th file named "OGAWA.BAS":
This program shows each checksum that should be the same one as the magazine's one. Created by S.Ogawa.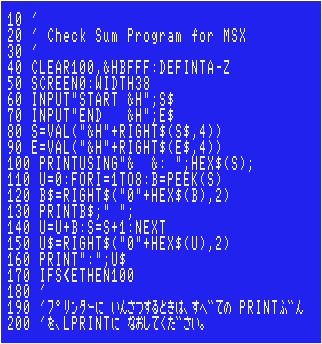
After you loaded the 2nd or the 3rd file, run this file.
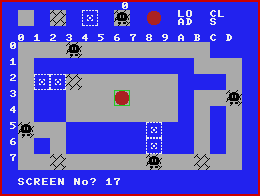 |
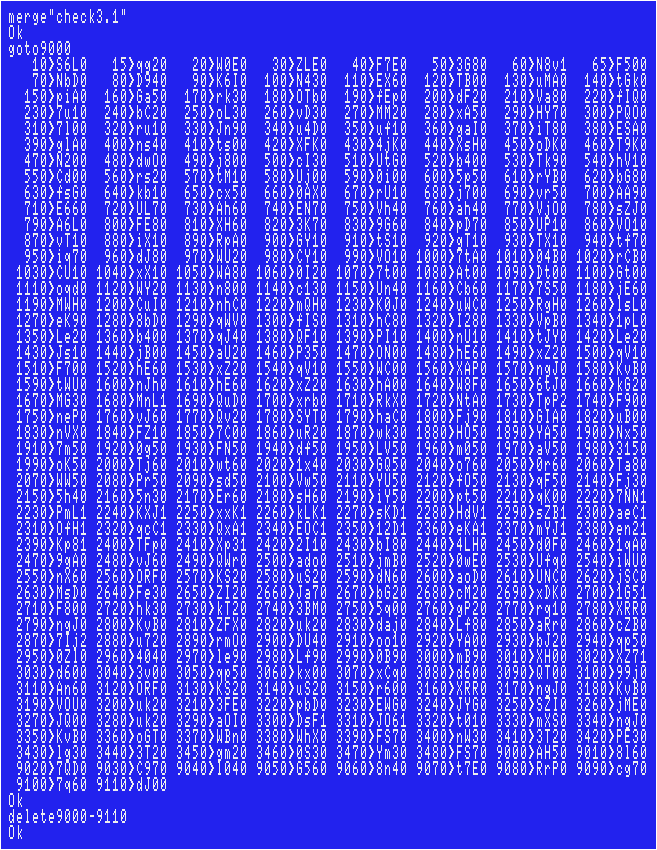
Run the 1st file, the game will be loaded. To enter the level editor, press up arrow key at the title screen. You must place all 4 enemies. Finally place the red sphere to decide where the starting point is. After that, press left / right arrow key and space key to decide which level to register, whether save the map, or whether start playing immediately. |
Joystick support:
The 1st file:"STICK(0)" is found in the lines #1350, #1420, #1430, #1570, #2590, #2790, #2870, #2900, #3170 and #3340.
"STRIG(0)" is found in the lines #60, #1340, #1410, #1460, #1590, #2640, #2810, #3190 and #3360.
The quickest way is to simply replace each "0" with "1".
In addition, it would be better if you modify the code as below.
The 2nd file (OS-LOVE.BIN):
Trigger 1: Poke the floor with main character's beak., Trigger 2: Defend (up to 3 times per level).
For Amiga CD32+FDD users:
AmiMSX cannot enlarge sprites so that it causes several graphical issues. Modify following lines.
Penta
| Author: |
T. Shirai |
| Characters design: |
Mihoko Maruyama & Tomomi I. |
| Release: |
"Micom" July 1986 Issue |
| Program length: |
13 screens |
The 1st file:
For disk users:This game is originally for tape only. This is because part of the program's area of use overlaps with the 1st disk's work area.
To load the game on Disk Basic, modify the code as below.

If you modify the code as described above, each checksum will change as follows. (using version 3.1 coded by the "MSX•FAN" team).
Sorry if there are any typos, however, I've tested my data, and had no problems.
The 2nd file named "PENTA.BIN":
The original file name was "M", but I'm assuming that you're managing a huge amount of MSX games' files.You cannot even save/load this file on Disk Basic.
First, enter all data using a binary editor on Windows to create one.
In such cases, we Japanese usually use freeware called "DumpWithRTCS".
Choose "Tool(T)">"Address Offset(A)...". Enter "D000". Then enter all hexadecimal numbers to E52FH.
Don't forget to compare each checksum with that in the magazine. (Choose "Checksum(C)">"Add8(E)")
Finally add a header as shown below to complete.
FE 00 D0 2F E5 00 D0
The 3rd file (The "memory monitoring" program):
You don't create this file if you use "DumpWithRTCS" described above.To load the game:
 Simply run the 1st file.
Joystick support:
The 1st file:Modify the code as below.

The 2nd file (PENTA.BIN):
D-pad up: Jump., Trigger 1: Continue from the current level after the game is over., Trigger 2: Restart from the 1st level after the game is over.
Tiny Ghost Town
| Author: |
Kimco |
| Release: |
"Micom" Jan. 1986 Issue |
| Program length: |
7 screens |
| Japanese title name: |
"タイニー・ゴースト・タウン" |
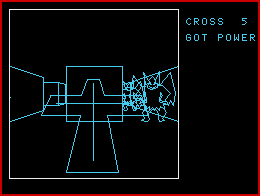 |
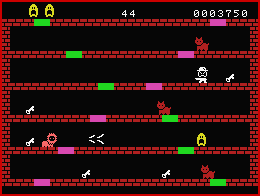
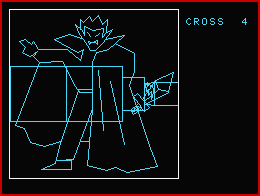
You come to a town where monsters roam, and you must defeat a specific demon. You can stop the enemy's forward movement by placing your cross in front of you. Once placed, the cross can be pick up again. Each time you pass through a wall, the number of crosses decreases by one, but when you enter a church, the number of crosses increases to five. To defeat the enemy, you need to get the power-up item (left image). Either action can be performed with the Space key. |
For Disk users:
This game is originally for tape because it breaks the 1st disk's work area after the program is loaded once.It highly recommends to modify the lines as below if you want to use your original characters by the editor.
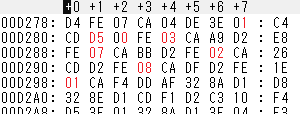
If you modify the code as described above, each checksum will change as follows. (using version 3.1 coded by the "MSX•FAN" team).
Sorry if there are any typos, however, I've tested my data, including the ending, and had no problems.
Joystick support:
Modify the lines as below.
Now you can use D-pad and Trigger 1.
Line Character Editor for MSX
| Author: |
Kimco |
| Release: |
"Micom" Feb. 1986 Issue |
| Program length: |
5 screens |
| Japanese title name: |
"MSXラインキャラクターエディタによる3Dゲームへのアプローチ: 君も3D迷路ゲームに挑戦してみよう Part 2" |
Note:
The fatal issue: Correct the line #620 as following, otherwise you won't be able to create even 1 character.
For Disk users:
This editor is originally for tape only because it breaks the 1st disk's work area after the program is loaded once.(It also needs to save your own data to the diskette.)
Fortunately it's not hard to offset the data that originally overlaps with the disk's work area.
Modify the lines as below.
If you modify the code as described above, each checksum will change as follows. (using version 3.1 coded by the "MSX•FAN" team).
Sorry if there are any typos, however, I've tested my data, and had no problems.
How to create your own characters:
   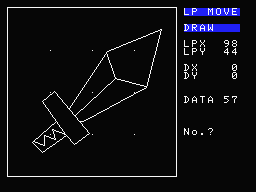 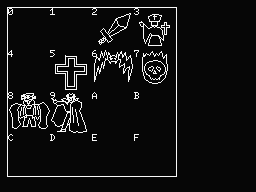 |
After chose "DRAW", you can see only "LP MOVE" flashes as left image. This means the cursor can move without drawing. Press SELECT key (CTRL+X keys). Move the cursor to the point where you want to start to draw. Then press SELECT key again. Only "LP MOVE" flashes. Press "down" arrow. You can see both "LP MOVE" and "DRAW" flashes as left image. This means the cursor can move with drawing. Press SELECT key. Now you can draw a line as you like. To undo, press BS(Back Space) key. If you want to move the cursor without drawing, Press SELECT key first. You can see both "LP MOVE" and "DRAW" flashes. Press "down" arrow. This means the cursor can move without drawing. Press SELECT key... If you want to return to the menu screen, press CTRL+STOP keys. If you press "up" arrow, you can stop the flashing of the letters "LP MOVE". The state of the left image is useful for drawing lines radiating from a specific position. Make sure that your data is less than 256, otherwise you will get "Subscript out of range" error(s) after you load the "Tiny Ghost Town" program with your own characters' data. When you have completed one picture in that way, press the Return key. You will be asked what number to register, so enter one of the 16 types from 0 to F and press the y key twice. Since you will return to the first screen, select "DRAW" again and draw the next picture. You can also paste the picture that has already been registered. Press SELECT key first, you can see you can move the cursor. Now press HOME key (CTRL+K keys). Then press one of the 16 types from 0 to F. This is useful for creating many dummies. This is because #0, #1, #4, and #A~#F are not actually used in the game although a fatal problem will occur if they are not registered. To create a dummy, move the cursor at least once to display "DATA 3" and press Return. If you select "DISPLAY", you can see the list of pictures you have registered. Please check if they are as following. 0: Dummy, 1: Dummy, 2: Power-up item, 3: Church, 4: Dummy 5: Cross, 6: Enemy, 7: Enemy, 8: Enemy, 9: Enemy(Boss) A: Dummy, B: Dummy, C: Dummy, D: Dummy, E: Dummy, F: Dummy If you're O.K, finally choose "SAVE". |
How to make your own characters actually appear in the game:
Modify following lines of the "Tiny Ghost Town" code as below.
 Wow!
Wow!>>Return to the "Type-in MSX programs" page