Hoi (Amiga)

Introducing Level 4


You can "swim" only when you reach Level 4.
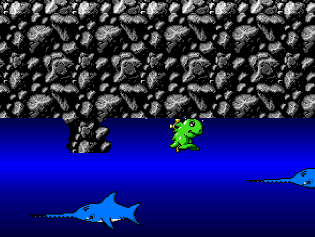
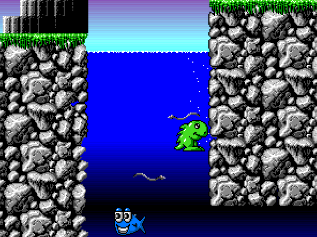
In addition to basically buoyancy, Hoi can be moved freely with D-pad.
The oxygen meter is displayed at the bottom right of the screen, and if you run out, you will die of suffocation.
The meter will recover if it rises to the surface again or is taken into the bubble.
On the other hand, once taken in by the bubble, it becomes impossible to control until it rises to the surface of the water.

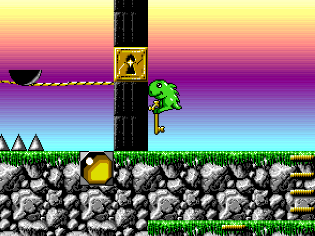
In this game, you will fall of death with a certain height difference, but this is not the case if the landing is on the water surface.

Actually, going from the first space to the next would be difficult.
You can jump high from the water surface if you  come out to the water surface from a deep depth while pressing D-pad "Up".
However, it is necessary to sew between the blue fish and eels while doing that.


The correct route is blocked by a wall with a keyhole.
The key is at the bottom of the underwater branch route.
While paying attention to both the remaining oxygen meter and the enemy, go to get the key.


Hooray! This will move you forward.
However, there are thorns all over the ground, and it's a dangerous place where the platform is moving onto a rope.
In this game, You must move Hoi along with the movement of the moving floor.
(Same as NES version of "Dragons Lair". It seems quite normal in Amiga games.)


...Look this hellish map.
At first glance, it's hard to know where to go from here, but there's only one way to go, and it's also extremely hard. 
So, brace yourself.


The “fragile floor” on both sides of point A will not disappear unless point B is completed.
First to B point. Here, it changes from "Instant death system" to "HP  system" (your HP is displayed instead of oxygen meter).
After the point B, you can see many moving floor that appears and disappears.
Hoi would normally die if he fall with a certain height difference, but only "1" HP is reduced and he revives.
However, Hoi's HP is "3", so if you fail three times, Hoi will die.
Although it is easier than the conventional instant death system, let's think that it is only a relief measure for the difficulty "this scene is unbeatable at the first play".

When you move using the moving floor from point B, it will return to the vicinity of point A. It returns to instant death system.
At this point the "fragile floor" has disappeared. It's time to swim.
If you didn't carry an oxygen cylinder before going to point B, that cylinder would be placed at point C.
There is a lethal height difference from point A to point C.
On the other hand, carrying items such as oxygen cylinder are caught in the algae at point D and cannot be carried from there.
So you have to go to get the cylinder that dropped at point C from below?
You have to bigger-jump than the early water jumps.
Moreover, avoiding bubbles and enemies (small fishes)!

Unbelievably, the correct route is point H. You have to carry the bomb to the cactus at point E.
Where's the bomb... Ah, it's at the bottom of such underwater...! (Crying)
When you get to that point carrying a cylinder, exchange the bomb for the cylinder. (Up to 1 type of carrying item!)
At this point, the length of stay in the water will become "finite".
Oxygen meter recovers by the bubble at point F on the way.
Immediately after, it seems that blue fish cannot be guided unless something tricky.
After that, dodge small fishes and rush to the surface of the water.
Then you take a break, dive again... and are you ready for your mind? (Lol)

You will probably feel relieved if a big jump could be successful, but the flower at point G has the role of a trampoline.
If you are blew, you will get on a platform right above.
Hey hey, you might not be able to go directly to the correct route even if you get on such a place.
Do you want to do it once again? I'm not kidding at all...

After destroying the cactus, pay attention to the two eels and head to the H point.


The mini game begins.
Since the ship cannot move laterally, it would require only the timing to throw the lure.
The ship's HP is displayed at the bottom right of the screen.

If you catch a blue fish, you will get a score, but if you miss it, that fish will bite the bottom of the boat.
The more the number of fishes biting increases, the more the HP meter decreases.
If you catch a spike ball, the decrease in the meter becomes noticeable.

When the meter runs out, it will be forced to the next area.
This was just a break. There is still a long way to go!


This area has platforms that is only visible once you get on and moving platforms that keeps blinking.
Although it feels like a first-time killing, it is not unreasonable as point B in the map introduced above,
and if you proceed carefully, you may not die many times.


The memory game begins.
The lights becomes colored in order from the left, so when the lights go out all at once, turn on the lights of the original colors.
There are 5 colors: white, green, red, blue and yellow.
At first, only the first 2 lights from the left should be light up, so it's easy.
Answer with the lower switch pressing the Red button.
If the answer is correct, one more platform appears on the right edge of the left screen.
Next, the first 3 lights from the left should be light up.
If you answer correctly, the number of that platform will increase by one, next up to 4 lights should be light up.
It's tough because every time the color is different.
If you make a mistake, one of that platforms disappears, and then the total number of lights will also decrease by one.
You can proceed above even if you do not go to the 9th, but if you succeed up to the 9th, 1up appears.
Don't forget that there is a lethal difference in height from right above each light to the “bottom”.


Next is a long sideways area where you can take a baby carriage.
While making fine adjustments to acceleration and deceleration with the left and right direction keys,
jump and run to avoid enemies and traps.
Controlling feeling and difficulty are very similar to the bike level of SNES game called “Plok!”.
In this area, it will be "HP system (HP=3)" again,
but that means "Please forgive us even if it is impossible to complete at first sight".

It's a terrible area where you feel like, "Why is this scene comes here?!"
even though you've finally arrived here since Level 4 started.


Again to instant death system.
It's just down the ladder and down there.
However, how many iron balls are there...
While seeing the movement with a set of 2-3 balls, pass through with good timing.

...Level 4 doesn't end yet!


A lot of faces that met at the Cantina bar bounce from the right side of the screen at various heights and lengths,
so you must move sideways to the goal avoiding them.

Since the appearance timing of these guys gradually shifts,
you would like to learn the patternization that you can survive the fastest in the first time as much as possible.

If you touch those faces on the way and die and revived, the timing becomes wrong,
then you should...,oh, I don't know!  (Lol)

Introducing so far is Level 4, it is soo huge.
Are you at a loss with starting such a level with the remaining number of tries "3"?


You hate Level 4?
However, after you could complete this level, there will be a reward, a reward!


If I describe Level 5 in one word, "non-stop action to escape from the terrain collapses".
However, it's not just the actions that are fun!
The terrain and background are mega demos, and the design seems to be Amiga-like and is really novel.
What outstanding sense!

In terms of "technology" in the retro game world, I have seen various things such as multiple backgrounds,
multiple joints enemies, translucency, complicated algorithms, etc.
Once again, I will be made to think about what "technology really means".
(By all means, on the big screen of TV! The power is different.)

But I bet the "HOI AGA" players will play Level 5 first and Level 4 that cannot be completed remains forever.
Hehehe...

>>Return to the "HOI" main page

>>Return to the "TOP 9 of the Hardest Platformers in any Amiga" page